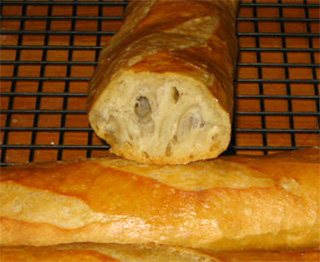
I like me baguette to be thin crunchy crush and soft, light, and chewy in the center. I follow exactly Schimpf's recipe just some add some additional ingredients. I add 1 teaspoon Malt Power and 1 tablet Vitamin C in the bread dough, and brush the eggs wash or melted butter and spray salt water before baking. I also bake only 13-15 minutes instead of 20-25 minutes.
Starter - Poolish:
All purpose flour - 100 grams (3.52oz - fair 2/3 cup)
Warm Water (100F-110F) - 100 grams (3.52oz = less than 1/2 cup)
Yeast - pinch (0.5 grams)
 |
Mix flour, water, and just a pinch of instant yeast until to a soft dough. Cover and let rest at room temperature for about 12 - 14 hours or at least overnight. If you use active dry yeast then you need to mix with warm water (100F - 110F) before mix in the dry ingredients. |
 |
| Here is how it’ll look like after its rest: soft and bubbly, kind of like a pancake when it’s ready to flip to the other side. If you’re planning to bake on a Saturday, make the starter late-afternoon Thursday, and it’ll be ready to go Saturday morning. This first rest gives the yeast a chance to start growing. |
Poolish
Bread flour 375 grams ( 13.23 oz = 0.827 pound)
Water - 225 grams (7.595 oz = = 0.949 cup)Yeast 1 grams
Salt 10 grams (0.353 oz = 1.645 teaspoon)
1 tablet Vitamin C (if use 1 tsp syrup mix with the ingredient's water, tablet mash to powder)
Final Dough Percentages
Flour - 475 grams (1.047 pound) - 100%
Water - 325 grams (10.97 ounce ) - 68.4%
Yeast - 1.5 - 0.3 %
Salt - 10 grams (1.64 tsp) - 2.1 %
1) Mixing Dough:
 |
 |
Whisk it around; it’ll soften, but not fully dissolve. |
 |
Next day, place the starter, flour, Vitamin C, salt, soft butter, and yeast mixture in a mixing bowl (or bread machine bucket). |
 |
| If you’re using a stand mixer, knead briefly with the beater, just till the dough becomes cohesive, same with knead by hand and let stand for 10-30 minutes. Then knead about 1-2 minutes |
3) 1st Fermenting:
 |
Lightly oil bowl and turn dough to coat with oil. Cover bowl and mist interior of bowl to create humid environment. Place the dough in a lightly greased medium-size bowl, cover the bowl, and let the dough rise for 3 hours, gently deflating it and turning it over after 1 hour, and then again after 2 hours. You do not want the dough to reach the stage where it collapses due to over-rising) |
 |
Look how lovely and elastic it is, too. If you’d kneaded it fully at first, it wouldn’t stretch like this. |
- The process of misting and loosely reapplying the plastic wrap may be repeated once or twice during the final proofing, depending on the humidity level in the kitchen and the length of time required to reach the size desired for baking.
Remove dough from bowl and divide into three equal parts, each 270 grams (9.5 ounces). flatten into rough ovals, and let them rest for 15 minutes. This gives the gluten a chance to relax. Gluten can be recalcitrant; the more you stretch it, the tighter it gets. Letting dough relax before shaping makes it MUCH easier to work with. |
5) Folding and Forming the baguette: The process of folding the dough and pressing the ends together should only be done twice. First, we want a tight or stretched outer crown to the loaf during final proofing. Second, we want to minimize handling so as to not degas the loaf after the primary fermentation.
 |
After 15 minutes, flatten one piece of dough into a rough rectangle. |
 |
Fold it over… |
 |
…and seal the edge with your fingers. |
 | ||
Flatten again…
|

 |
| Turn it so the seam side is down. |
 |
| Roll gently, starting in the center...and working your way out to the edges. Don’t press down hard; just gently roll the dough under your cupped fingers, and it’ll lengthen on its own. If it doesn’t, give it a 15-minute rest, while you work on the other two pieces, then come back to it. |
 | ||
Here they are, ready to rise; cover them with a free-standing cover, or with greased plastic wrap and and allow the loaves to rise till they've become very puffy, about 60 minutes. Misting the loaves and covering loosely with plastic wrap will prevent them from drying out during proofing in an uncontrolled environment.
|
 |
Use a razor blade or other very sharp blade to make three diagonal slashes in each baguette. Hold the sharp knife at a 45° angle to the bread, be quick, and use firm strokes. |
 |
Brush egg wash or melted butter and spray salt water, |
 |
Immediately prior to loading the loaves to the oven and bake for 13-15 minutes.  Gently turn (you may have to pry it free just a tad) the loaves bottom side up in the pan to promote even crisping and browning. Bake for about 5 minutes, during which you can even rotate the loaves so that the sides brown and crisp too, or until the loaves are crisp all over. |
No comments:
Post a Comment